Welcome

Welcome
Welcome

Fake 3D in Photoshop

152-58-final

Fake 3D in Photoshop

This is one of those tutorials where we will use Photoshop not because it is the ideal tool, but as a demonstration of Photoshop’s power and versatility.
This tutorial was inspired by a request to know how to replicate a certain imagery style using only Photoshop. These referenced images were produced using 3D software, such as 3ds Max, which are built for producing such scenes. Trying to reproduce this effect using just Photoshop (not even with the help of Illustrator and its useful line-drawing and 3D effects tools) is a wonderful way to get to grips with many of Photoshop’s functions. This kind of layered concept looks very cool when combined with natural textures and glossy Web 2.0 stylings, plus Web Designer adopted it for the cover of issue 145. What’s more, faking three-dimensional objects in Photoshop has a lot of uses in design other than being a demonstration of its abilities. Apart from the fact that it negates the need to either purchase or learn 3D software, it can often allow results to be produced far more quickly.
We will have a good look at Photoshop’s Transform function in creating the illusion of perspective, as well as clipping groups and airbrushing to create shading.
This image was created at about 3,000 x 3,500 pixels in size, so any measurements in this tutorial should be adjusted to whatever size you work at. Happy faking!

This tutorial was written by Nik Ainley and first appeared in Web Designer issue 152

Download all the files for this tutorial here http://www.webdesignermag.co.uk/tutorial-files/issue-152-tutorial-files/

01 Line ‘em up

152-58-1

The most important aspect of getting a good 3D feel is creating realistic perspective. To achieve this, we are going to create a guide grid. There are two ways to do this. The first involves drawing out a grid such as this using the Line tool or Pen tool, and then transforming it with Distort selected to give it some perspective. This method is preferable, but the next one is almost certainly quicker.

02 A bit of perspective

152-58-2

The second way is to use the Vanishing Point filter, which is rather useful for perspective-based trickery. On a new layer, enter the filter and draw out a plane with a nice perspective. Then click on the little arrow at the top and choose Render Grids to Photoshop, then exit the filter and you have yourself a nice grid to use. The filter can get oddly grumpy about producing differently orientated planes, though, so watch out. The Plane Drawing tool will change colour to let you know this is happening. We explain why we don’t use the filter for the whole process in the boxout on page 60.

03 Background work

152-58-3

Now place and keep this grid at the top of your image. We will be turning it on and off throughout in order to match various objects’ perspectives to it. Add a gradient to the background, trying to match the angle of your grid. This in turn adds a quick bit of depth.

04 Shape time

152-58-4

Now to add our first object. You can use anything you want here really; simple geometric shapes work very well. Using either the Pen tool or the Shape tool, draw out a simple shape. Make it quite big so that distorting it later doesn’t introduce fuzziness.

05 Details

152-58-5

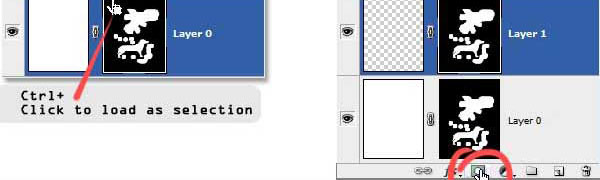
To make our shape a bit more interesting, we are going to add some colour and details. First of all, we made sure the shape was white, and then got a selection based on its outline (Ctrl-click on the layer’s thumbnail). We then contracted the selection by about 20 pixels (Select>Modify>Contract) and filled this with a dark pink on a new layer


06 More details

152-58-6

To make it a bit more interesting, we first added a layer style to this new layer. We used a Gradient Overlay, white to black, with a Soft Light blending mode from top right to bottom left. We also added a fuzzy Inner Glow using a dark grey and blending mode set to Overlay. We then duplicated this a couple of times, shrunk them down and recoloured them.

07 Merge

152-58-7

Now we are going to match this object’s perspective to our grid. At this point, make sure the object’s colours and details are as you want them, as it is much harder to change after this process. First merge all your object’s layers together. If you want to use this object several times, create a copy of your layers before you merge them and hide them so that you can use them again later.

08 First distortions

152-052-step008

With your grid enabled and your merged object selected, enter Transform mode. With the Distort mode selected, choose where you want your object to be and start matching the perspective of the grid. Note here that once we have transformed our object, it will be matched to the perspective at that specific point on your canvas and can’t be moved again.

09 Use your eye

152-58-9

The important thing to keep in mind here is to match the angles of the Transform tool’s edges to your grid. If they are directly over a grid line then they should run in exactly the same way. If they are in-between grid lines, make sure their angle is somewhere in-between the grid lines’ angles that they are within. If your grid doesn’t have enough lines, you might have to go back and make another one. Use your judgement to decide what looks right.

10 Flat is boring

152-58-10

Now we want to add some depth to our object. First of all, make sure you are zoomed in at 100 per cent (if you aren’t already) and select your object layer. Now, holding down the Alt key, tap the down arrow about 20/30 times. To repeat having to do this in the future, you might want to write a quick Photoshop action that does this for you


11 Too many layers!

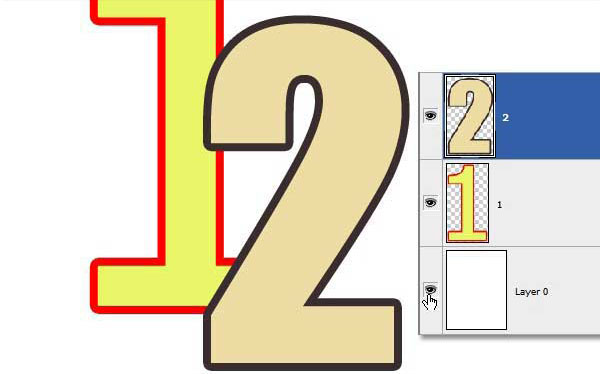
Now select all of these copied layers (do not select your original layer, which should now be at the bottom of the stack) and merge them together (Ctrl+E). Move this new merged layer underneath your original layer and make it all white (Ctrl+U and push the Lightness slider up to 100). You might not notice any change at this last step, but that’s okay.

12 Shading
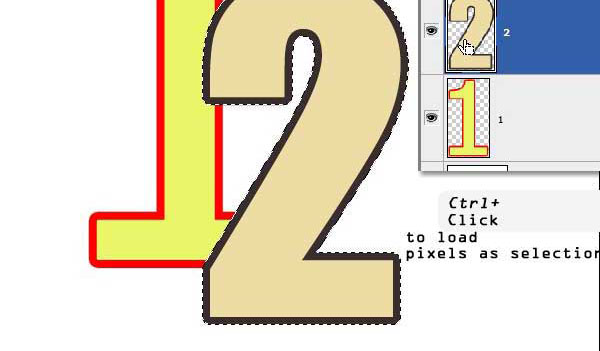
We want to add some shading to this new layer to give the impression of depth. First of all, lock the transparency of your bottom, all-white layer. Now, using the Gradient tool set to black to transparent and Linear, drag from the left inwards and then right inwards. This part is very much down to personal judgement in terms of how you want it to look.

13 A little bit more detail

152-58-13

In order to add a bit more realism, we are going to pay special attention to the corners (or in this case, corner). Zoom right in on the corner of your object, and create a selection that only has one side of the object inside (however, it doesn’t matter which right now).

14 Smarten those edges up

152-58-14

Hide your selection so that you can see what you’re doing better (Ctrl+H), then using a big, soft brush, daub black onto your layer just outside of your selection. The fuzziness should creep over the edge of the selection onto your object.

15 The dark side

152-58-15

side of your object. Make sure to make it either slightly lighter or darker than you just did so you end up with some distinction at the edge. We decided to have the right-hand side of our objects always darker to give the impression of a directional light source.


16 Well, that was easy but…

152-58-16
If we want to use other objects with less rectangular shapes, we have a slightly more difficult job matching perspective. However, there’s a very easy trick we can use to help this. Let’s try a disc. On a new layer, draw a circle.

17 Be square
Do the same sort of tricks and effects you did to your first object to make it look a bit nicer. Once you have merged these layers together, draw a big square that just encompasses the circle on a new layer underneath. Use a contrasting colour so it stands out from the circle.

18 Much easier!
Now match your new object’s perspective to the grid as before, but make sure you have both your circle and square layers selected. Luckily, transforming them both at the same time is no problem for Photoshop. Match the grid lines up to the transform box as before. Once you have done that, you can simply delete the square layer. A circle isn’t too much of a problem, but for more complex shapes, this technique really helps.

19 Pesky shadows

152-58-19

Adding shadows between objects is one of the best ways at creating the illusion of depth, and also one way in which 3D programs produce amazing results much more easily than Photoshop. The easiest way to have the shadows is associated with the object they are falling on, rather than with the object they are casting. Here, create a new layer above the object you want the shadows to fall on, and group it with the object layer (Alt-click on the line between the two layers).

20 Make the icon illustrations selectable as one

152-58-20

In order to make the icons selectable as one object, we converted the vectors to objects. Do this by following Object>Path>Outline Stroke. Next up, we selected the objects we wanted as one, then divided (from the Pathfinder tool), ungrouped and finally merged them. Now the icon is selectable as one single object with the details as knockouts

21 Block party

152-58-21

We now have the basic techniques for creating the entire image. So we just have to keep creating objects, match their perspectives to somewhere on the grid, add depth and make sure the shadows are in place. This is the time-consuming part, and you can add as many objects as you like. Try to keep your layers organised into layer groups to stop yourself from going mad.

22 Float them all

152-58-22

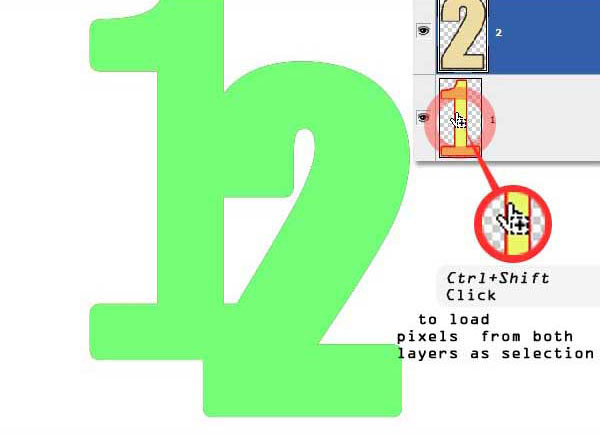
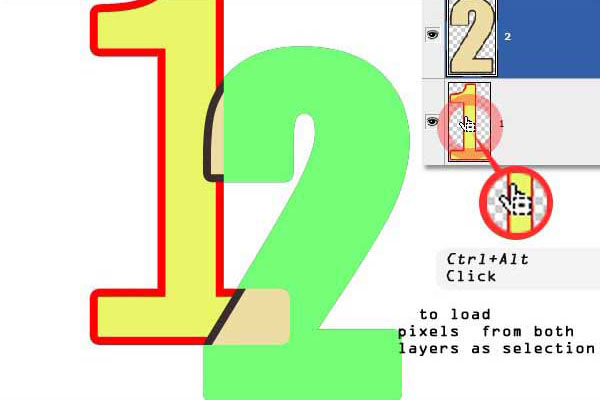
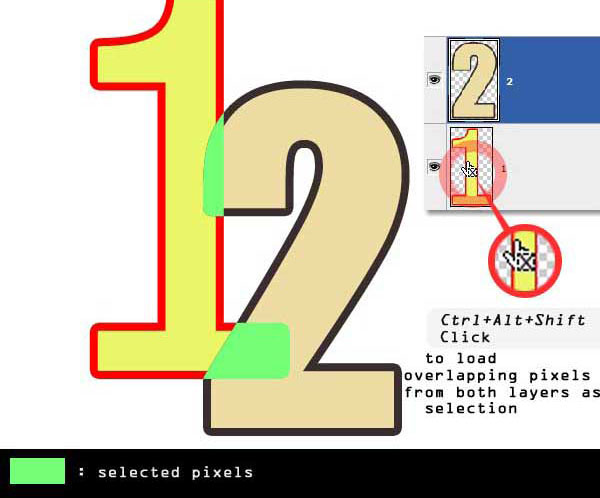
Once you have finished creating and placing all your objects and are happy you aren’t going to add any more, we can add a bit more depth by giving them all a shadow. Select the outline of all your layers (Ctrl-click on your layer thumbnails while holding down Shift), then on a new layer just above your background, fill this selection with black. Apply a Gaussian Blur to this layer by about 40 pixels, move it down and to the right a bit, then drop its Opacity until it looks right.

23 Flatten it

To add a few finishing touches to the image, we first need to flatten the entire thing. Do this and copy the result into a new document. It’s best to do these final bits separately to your layered file so you can go back and change things if necessary. Run a Gaussian Blur over your new flat layer (about 30 pixels or so) then fade (Ctrl+Shift+F) to a Soft Light blending mode of about 30 per cent Opacity.

24 Depth of field

152-58-24

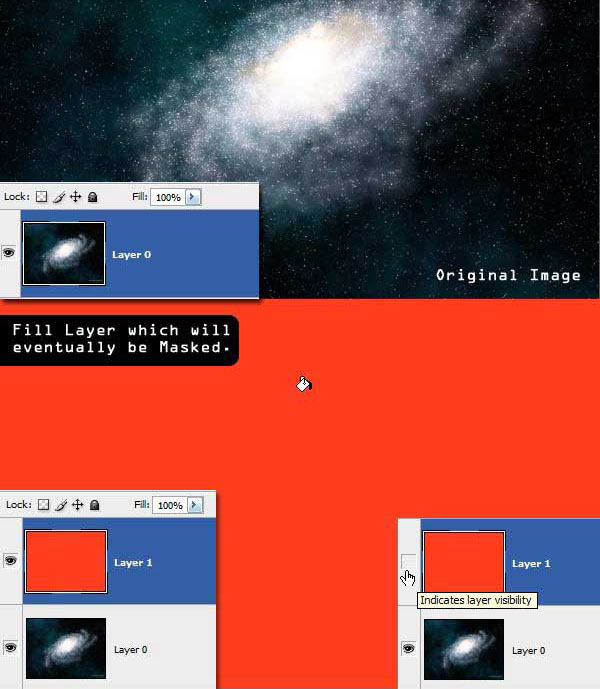
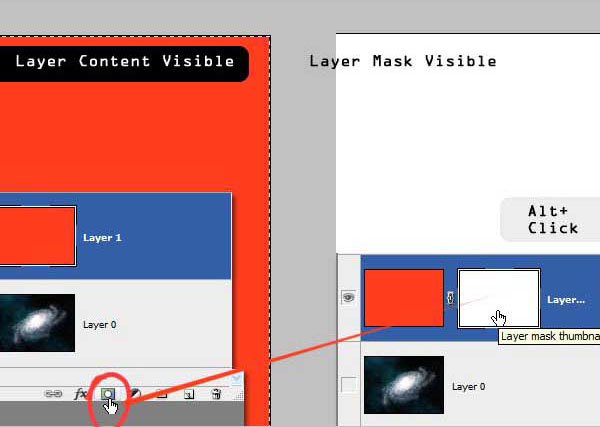
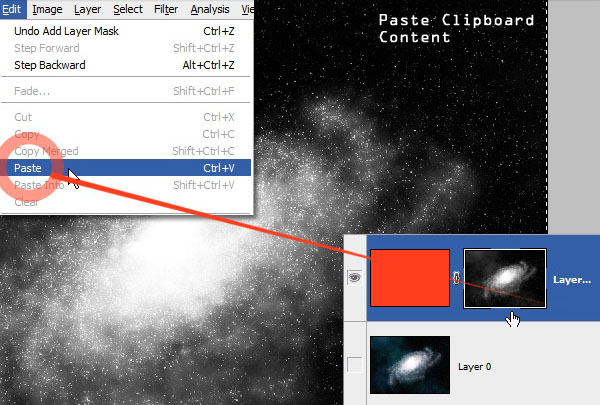
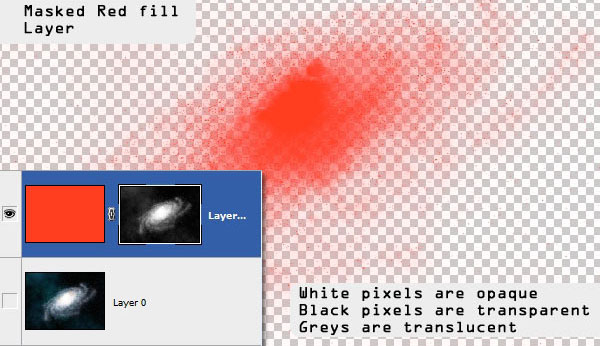
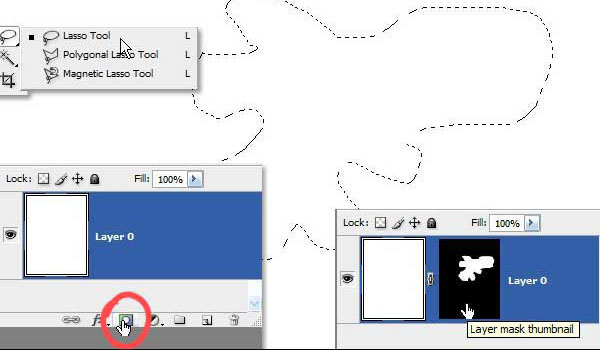
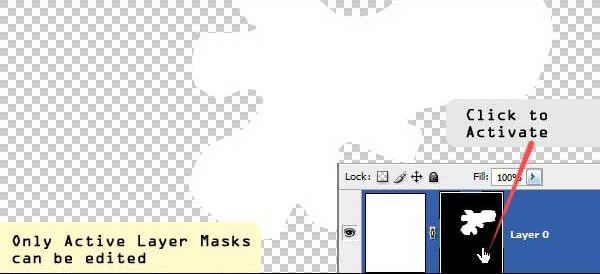
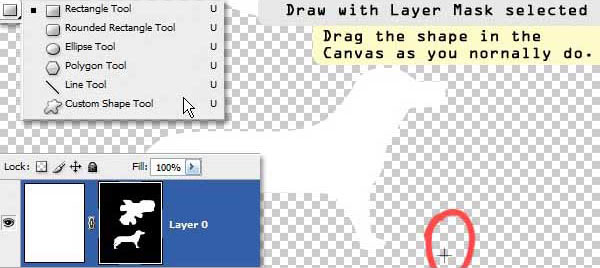
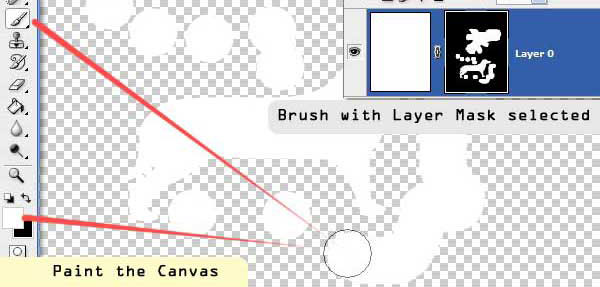
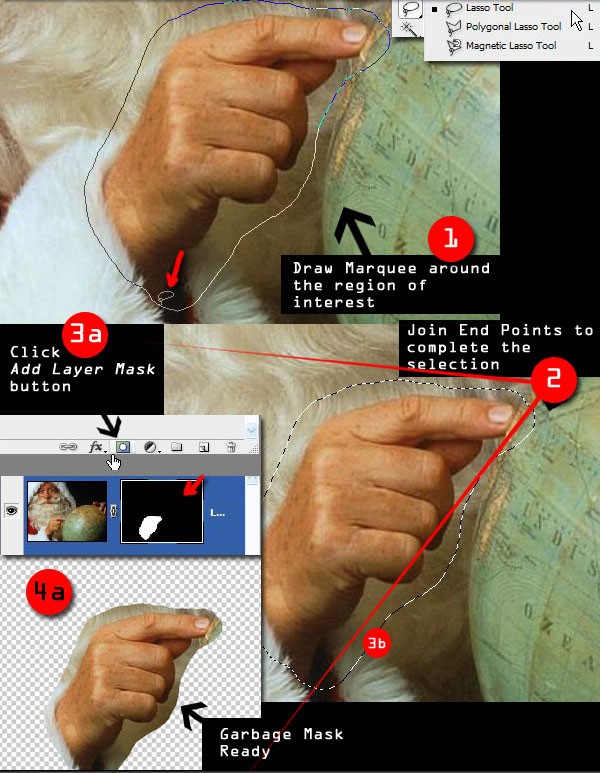
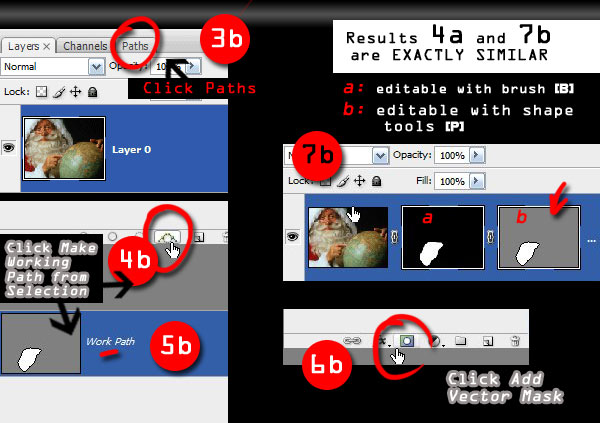
Now to add some fake depth of field. Duplicate your image and run a Lens Blur filter on it (40 pixels or so). Add a Hide All Layer Mask to this layer (hold down Alt while clicking the Add Layer Mask button). Use a white to transparent gradient, or a big, soft brush to start adding white to this Layer Mask to make parts of the image blurry. Try making the top or the bottom of the image blurriest or specific objects that appear to be further below the others.

25 Final touches
152-58-25

Flatten your two layers together and run a light Unsharp Mask on them (settings of 30, 0.6, 0 should do) and make any final tweaks to lightness or colour you think the image needs. That should be it; hopefully, you’ll have something that looks like our image.

In detail
Not quite perfect

There are several different ways that doing 3D in Photoshop makes things a lot harder than using a 3D program. Apart from the fact that all the lighting and shadowing has to be done manually and won’t be as accurate as with a 3D program, we are much more constrained in terms of moving things around.
To demonstrate this, the shiny object has been moved from its intended position in the image below. As you can see, its perspective is now completely wrong and it doesn’t fit in with the rest of the image at all. However, if we wanted the object here, we would have to reproduce it as a flat object and then distort it to match the grid in its new position.

Quick tip

152-58-b2
A clever way of bringing interest to this sort of image is by adding details to the front of your objects. Make sure that you do this before adding perspective to them so you can do the distorting all in one go. Try adding shapes, patterns, textures or text to your objects to make them livelier. Feel free to vary the colours, but try to keep an overall colour scheme in mind.

A Comprehensive Introduction to Photoshop Selection Techniques


A Comprehensive Introduction to Photoshop Selection Techniques


Have you ever had difficulties making selections and thought there was a better way? Let's review both quick solutions, and on the other side, comprehensive and details techniques for making selections. Each approach has it's place in your workflow. The more methods you know how to use, the faster and more effectively you'll move in Photoshop.


Selection in Photoshop

Photoshop selects pixels based one of the three properties, as shown in the image below:

  1. Chroma: is the color of the pixel. Color of a pixel is the level of RGB values and color based select tools like the Magic Wand. Select by color uses the RGB% as a criteria to group pixels based on the set tolerance values.
  2. Luma: is a selection based on Illumination levels. Illumination levels are whiteness of the image, which is nothing but higher values for all the three R, G and B channels. Photoshop doesn't have a native interface for a Luma based selection, but many existing tools can be hacked to get a similar result.
  3. Masks: are based on spatial position. Pixels are selected and discarded or masked by a parallel layer bound to corresponding image layer. Masks are grayscale and brightness of the mask is called an Alpha level, which is the degree of opaqueness of the corresponding layer pixel. It's also called the Transparency/Opacity channel as in RGBA etc.

A Note on Masks

In this article, words like Masks and Alpha will be used interchangeably. The process of transferring images to layer masks will be shown once and then used repeatedly without explicitly mentioning thereafter.

Step 1

Open a new image that you want to use as a mask. Double-click the background layer and create a new layer, which is "Layer 0." Make a new layer, which is "Layer 1," on top of it and fill with a uniform color, then hide "Layer 1."

Step 2

Go to "Layer 0" and click Select > Select All (Command + A) to select all pixels. Next, click Edit > Copy (Command + C) to copy all pixels to the clipboard.

Step 3

Go to "Layer 1" and create an empty Layer Mask. Initially an all transparent Layer Mask will be created. Alt-click the layer mask to see it in the canvas.

Step 4

With the Layer Mask visible, paste onto the canvas by clicking Edit > Paste (Command + V). A grayscale version of the copied image will be pasted in as the layer mask.

Step 5

Click on the fill layer thumbnail (not mask) to see the result. Any image can be applied as a Layer Mask to another layer. The opacity of the layer will be controlled by grayscale level of the mask.

More on Masks

The easiest way of creating a Layer Mask is to click the Add Layer Mask button with something selected on the canvas. The selection will be saved as a layer mask attached to the current layer and everything outside the selection marquee will be masked and hidden.

Activate Layer Masks

Alt-clicking on the Layer Mask makes it active for editing. Only activated layer masks can be edited which are represented by a thin white outline around them.

Add Shapes to Layer Masks

Dragging any shape onto the canvas while a layer mask has been activated will draw it on the Mask instead of the layer itself. To draw it again on the layer we need to deactivate the Mask by clicking on the layer thumbnail.

Add Brush Strokes to Layer Masks

The same is true for brush strokes. Anything painted on the canvas with a Layer Mask selected will draw it on the Mask instead of the Layer. We can use this property to select objects with irregular boundaries from backgrounds, by painting everything else black on the Layer Mask. White brush strokes will reveal and blacks will conceal.

Copying a Layer Mask to Another Layer

Finally, we can transfer the Layer Mask to another layers by simply loading it as a selection (Command-click) and unloading as we did in the first step by clicking the Add Layer Mask button. Or by Alt-dragging the mask to another Layer (Not Shown).

Boolean Operations with Selections

This example shows how to Load, Add, Subtract, and Intersect selections between overlapping layers just with quick thumbnail clicks.

Load Pixels to Selections

In "Layer 2" Command-click to load a fill as a selection. Any pixel which is not transparent in "Layer 2" will be loaded as a selection. This is not the same as copying the layer, only its outline. The green fill shows the selected region although you will get only the surrounding Marquee. Let's call this state (with "Layer 2" selected) the initial state.

Addition

With the "Layer 2" loaded as a selection, Command + Shift-click on "Layer 1" to add it to the selection. Now non-transparent pixels of both "Layer 1" and "Layer 2" are combined as the new selection. Notice the small plus sign in the Command-Click box.

Subtraction

Revert to the initial state and Command + Alt-click on "Layer 1." This will subtract any overlapping pixel of "Layer 1" from the current selection of "Layer 2." Notice the minus sign.

Intersection

Revert to initial state and Command + Alt + Shift-click on "Layer 1" to keep only the overlapping pixels as a selection. Notice the X sign. If the layers are not overlapping this action will deselect all.

Garbage Masks

Garbage Masks are created to roughly isolate the 'region of interest' from rest of the image. Further trimming is carried out inside the Garbage Mask with precision.

Vector and Raster Selections

Draw an outline around the region of interest in the image with any of the Lasso Tools and double-click to complete the selection. A Garbage Mask needs to be saved for further refining, which can be done both as a Layer or Vector Mask. We must choose it depending on complexity of the outline and how we are planning to trim it later on. With the Lasso selection click Add Layer Mask to save it as a Layer Mask.

Alternatively, we can also save the selection as a Vector Mask which can be later refined by working on the shape spline that defines its outline. With the Lasso selection still intact (2), go to the Paths tab (3b) and click Make Working Path from the Selection button at the bottom. This will save the selection outline as a Shape Working Path.

Now load the selection again, and return to Layers tab. Click Add Layer Mask once to create a Layer Mask (Command-click to load again) then click the same button( 6b) once more to Add Vector Mask. Saving selections as Vector Masks or Shapes saves memory.

Selecting with Vector Mask

Click on the Vector Mask to activate it. Or selecting any of the Shape tools will make it active. Vector Masks are modified by adjusting the spline positions (Control Points) and curvature (Tangents). You can disable, delete, or save the Layer Mask with another Layer. The Convert Point tool is most suitable for altering Vector shapes and Paths. Click and drag on the handles, then Command-click on control points to move them.

Once a acceptable outline has been achieved use the Add Points tool to refine and further match the outlines. Delete points when necessary. Dragging handles with Command + Shift will lock their relative slopes. Drag directly on the Control Point to reset handles. Regular curvy shapes are best to be extracted with this process.

This method is also best in situations where boundaries are not clearly visible.

Select by Color Range

Selecting by color is the fastest way to Chroma select. Click Select > Color Range and select a color with the Eyedropper Tool available. Once selected certain shades can be removed selectively with the Minus (-) Eyedropper or again added with the Plus (+) Eyedropper. There is also a preview window that displays the selected region or the original image.

This tool can be used to setup Garbage Masks around the subject and later refine it with editing the Mask. Select by color is not a one-click solution, but does a great job in minimizing manual work.

Chroma from Channels

Color information of each type are stored in as separate channels, which can be viewed in the Channels Tab. We can use the channel wise variations in color intensities for selecting objects in the image. This process is helpful only when background and foreground have separate color distribution in at least one channel.

Advanced Chroma

In the Histogram we can see that the blue channel is predominant in the image and it extends up to the highlights where other channels are very weak. Our subject here is the patch of vegetation in foreground.

Picking the Best Channel

A simple observation of the three channels tell us that the blue channel has the highest contrast between the Sky and Grass. We are going to exploit this property to separate the two. Duplicate (Command + J) the Layer and go to the Blue channel of the Copied layer. Click Image > Adjustments > Curves or Press Command + M to apply curves modification on the current channel.

Applying Curves

Select the point closer to the dark grays of the channel and drag it (2) forward in the x-axis (horizontally) keeping y-axis at 0 (shown by the small circle). This will make the darker pixels uniformly more darker. It shouldn't affect the background, drag it a little back to left if it does.

Next, select another point closer to the White Point, drag it (3) back towards the midtones keeping the y-axis(vertical) at maximum (shown by the small circle). What we are doing is saturating the dragged range of blue up to 100%. Make sure the whole background turns white or almost so, and there is a very high contrast between the Grass and Sky.

Channel as Mask

Command-click on the channel thumbnail to load the channel into the selection. Areas which are predominantly blue will be selected totally and the rest according to respective degrees. Areas which have no blue (the black parts) will be left from the selection. With the selection in place go to the Layers tab and click Add Layer Mask to save the selection as a Mask.

Inverting the Mask

Press Command + I to invert the Layer Mask.

Selecting by Brushing on Masks

Brush based selection is used to extract foregrounds with complex outlines with accuracy. It is also used to refine selections made with other techniques. And it also support transparency (softness).

Erasing is probably the first thing that comes to mind when we talk about brush based selection. But it is not a recommended process at all. Erasing is a destructive process and can permanently damage the original image as recovery is limited only to a number of undo levels we have set.

Brushing with Layer Masks

Here too Layer Masks can be used, to preserve the workflow of Eraser and additional possibility of recovering removed portions if they are needed. Painting on the Layer Mask with a White or Black will reveal or hide the contents respectively. We can brush out backgrounds in the same way as in using the Eraser tool and get it back by painting with White.

No Feedback

When brushing the mask we may sometimes trim off relevant parts accidently and keep focusing on the wrong silhouette only to be discovered later. This is highly probable when foreground background have similar hues and there is no immediate visual feedback.

Immediate Feedback

This problem can be averted by following a simple rule of keeping a multiplied duplicate of the current layer in the background as a guide layer. Multiplied gradient maps will show-up as high contrast versions of the subject outlines if violated.

Luma Select

As already mentioned Luma is the illumination levels of an image. Luma can be used to extract components from the image which have a considerable brightness difference than others.

Simplest Luma Hack

Unlock the background and make a duplicate of it, then hide the original Layer.

Apply Threshold

Apply a Threshold Adjustment Layer on top. You will notice that some parts of the image have been turned instantly black and rest are pure white, and there are no intermediate grayscale levels.

Adjust Threshold

Adjust the Threshold Slider and try to enclose the subject or background (whichever is darker) in black. Hide the Threshold layer and look at the original image for guidance when required.

Merge Layers

Command-click to select the top two layers and Merge them into one. Select the bottom layer, make it visible and create a blank Layer Mask.

Add Layer Mask

Copy the merged image and paste to the Layer Mask, following the process discussed above. We have our Layer Mask ready, but in most cases there will be holes and parts of our background visible. Use the Mask Painting technique discussed above to make it tidy. Invert if necessary.

Luma Select with Transparency

The Threshold technique discussed above is very fast to implement, but is only useful for extracting solid objects as it lacks transparency. The following method can be useful in situations where we need Luma extraction with transparency. Here we are going to remove the ice-water from the rest of the rocks.

Using Luma to Mask with Transparency

Unlock and Create a layer from the background (1). Apply an Adjustment Layer Black and White on top and then a Brightness-Contrast Adjustment Layer above it.

Reduce Brightness

Select Use Legacy mode and slowly move the Brightness slider to left, try to get as many black areas from the rocks as possible. This process will reduce the brightness of the Water too so don't overdo it.

Increase Contrast

Now slowly increase the Contrast slider to the right. With each increase dark-grays will turn to black and lighter grays will glow more brightly. We are going to get the whites as opaque and grays as semi-transparent. Try to get both Whites and Grays where necessary. Over increasing the contrast will make it look like a Threshold Layer, if so there will be no translucency left.

.

Merge the Layers

When satisfied with the results Merge the top three Layers. Go to the background layer and Add a Layer Mask and copy the merged Layer into the Layer Mask.

Yet Another Possibility

Other than the above two procedures there is also another way of Luma based extraction using the Lab color method.

Lab Color Technique

Open an image and turn it to Lab Color mode by clicking Image> Mode> Lab Color. Goto Channels Tab and find the lightness channel or press Ctrl+1 to directly select it. This is where the illumination levels of all pixels are indexed in the Lab Color mode. You can play with that channel and try to isolate some element from the background. Don't forget to duplicate the Layer or the Channel before you alter any channel.

And filters that doesn't work on the image in Lab Color mode works on the Lightness channel, and yield almost similar results.

Conclusion

Photoshop has quite a few options when it comes to selection techniques. Try applying some of these solutions in your workflow to increase your productivity and effectiveness